Home

Wednesday, June 27, 2012

Chevron Side Table

I can't believe it's taken me this long to actually do something with chevron. 
I think I was scared to try and 
get all of those angles wrong and inconsistent. 

For whatever the reason, I have put it off
that is until
 today.

I got this really sad looking side table at a garage sale for $5.00, the top was a mess.
(had a hard time finding anything good about this fake wood table)


I primed with KILZ
(of course)


 then I painted the drawers pewter grey and the body smoke gray
(does anyone else notice that KRYLON spelled grey/gray both ways)


then I made my stencil from a cereal box

I know the stars were aligned when it
 fit both side to side and up and down perfectly.


  painted the stripes white.
(see how even the spacing is)

I'm telling you I feel like I need to go and buy a lotto ticket,


and DONE

I left the hardware the orginal colour because
 I really like the contrast of the cool paint colours
 against the warm brass.


This looks so much better.
Just going to put a couple of coats of poly on to give it a glossy finish,
I just couldn't wait to snap some pictures.


Monday, June 25, 2012

Side Table #3


My last bedside table
and
I was so excited for this one because it was a technique I had never tried.

It was using VINEGAR and STEEL WOOL to stain wood. 

 The site I got the idea from said that their wood ended up looking a
smokey grey
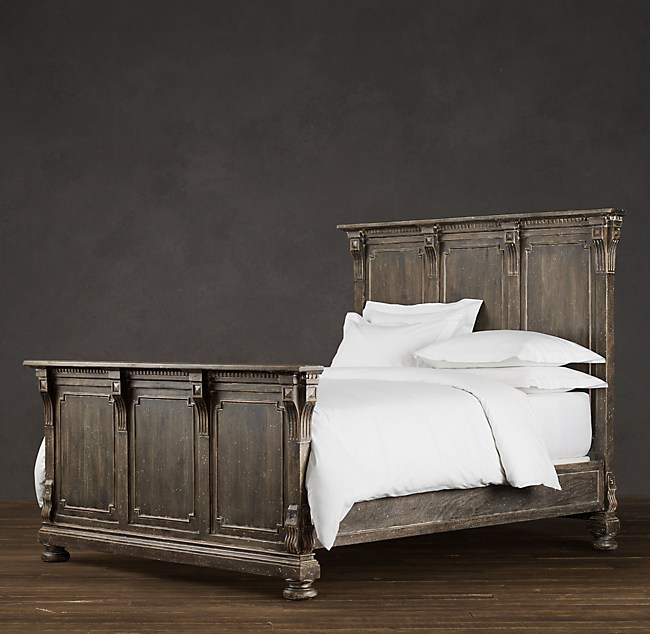
 and I was so excited as visions of Restoration Hardware came to mind.

St. James Panel Bed Antiqued Coffee

Alas,
 it was not meant to be as mine ended up a redish orange.....

but here is the transformation.


the before
(got this baby for $2.00)


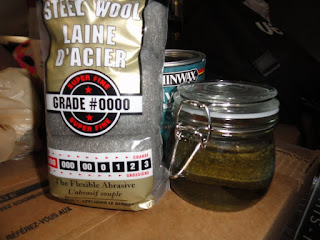
 mixture of vinegar and steel wool
(this sat for a couple of days to darken)


sanded the top down to bare wood


primed and painted the bottom.


started to stain with the vinegar.
(not going to lie, a little stinky)


Then it dried to a chalky reddish finish.
WHAT?!?
I wipe off the chalky looking dust.


and applied two coats of polyacrylic.
Turned a darker version


It dried lighter and slightly orange

*remember I was going for grey*


I ended up distressing the edges.


 Not exactly what I was going for,
but it's in great shape and freshly painted.


I'm glad I tried this on something smaller. 
I 'm not sure I would do it again.
 I'm still on the hunt for an old greyish stain to do on a midcentury dresser.

Here are all three side tables

#1


#2


and #3


I think #1 was my favorite.

Friday, June 22, 2012

A New Bulletin Board

Well I was trying to get side table #3 done today
and it's just not going to happen.  
I'm trying something I've never done for the top. 
 It involves

VINEGAR,

but it needs to sit and "age" for a couple of days. 

So while I waited I made this bulletin board for my daughter
who has been dying
 for a place to hang her quotes,
 pictures of friends and
little handouts from church.


This board started off as a frame


it got primed and painted


found an old cork board (for $.50)

 cut it down to size

covered it in fabric


and it's ready for "pinning"
 (old fashion style)


She's very happy.
I'm happy that it took less than an hour to make.

linking

Wednesday, June 20, 2012

Bedside Table #2


OK, on to side table #2. 


 Thought I would go blue (KRYLON Bahama Sea) and some

DISTRESSING

This one needed some extra love and got wood filler, sanding, a good coat of KILZ Primer and then the colour.


I then took my sander and hit all the
edges and gave it that nice distressed look.


I love how easy it is to make it look worn and aged

and here is #2 all finished


 and a little staging


I thought about lining all the side tables up for a group AFTER picture,

but the green one sold within the hour.
Yeah!!


Tuesday, June 19, 2012

Side Table Makeover

You know the saying that bad things happen in 3's,
well I'm here to tell you that good things do too. 

 I had the BEST weekend finding furniture at garage sales this week. 

 I found
2 coffee tables,
1 mid century dresser,
1 bookshelf and
 3 side tables.

(total cost of all 7 pieces $32.00)
*smiling*


Two were from the same bedroom set and the third was just a fluke. 
 I've decided to try and do three different technique's on them. 

The first technique is
STENCILLING

but before I could do that I sanded lightly,
 primed with KILZ, and painted it Ivy Green from Krylon.

Then I pulled out my trusty MS stencils


picked my pattern,
 found some Craft Smart paint called Lime Green,
added a little white and went to town on the edges.

(they kind of already had a border, but this pops it even more.)


Then I did a border around each drawer front


and spray painted the hardware a hammered bronze. 


Here is my first style of these side tables.


I love how the stencil is just a little lighter than
the Ivy Green and gives a subtle design element.


It always amazes me how a fresh coat of paint can really take something out of date and give it a whole new vibe.


Saturday, June 9, 2012

Distressing is not so distressing

That's right, in fact distressing a project is so rewarding for me. 

(I love how sanding and glazing bring the details out.) 

For example I got this plate from a garage sale for $2.00
I saw that it had "good" bones
...for a plate
;)

I really didn't love the darker brown colour of the middle pattern.


  So......
I primed, painted and lightly distressed it and made it something wonderful.


 Gotta love Krylon's Ocean Blue with
 sanded edges and details


Now I just need to fill it with something.....I guess it's time to go shopping.
maybe something white or tarnished metal or maybe some mercury glass.