Home

Friday, April 27, 2012

Ice Cream Fun


 Had some cupcakes left over from yesterday's cake walk
and decided to let the kids and their cousins make their very own ice cream cake. Just look at all the yummy toppings they put on, I think they look great and so colourful.


I love how the lime green and pink  play off each other.

Thursday, April 26, 2012

Cake Walk

Pinterest has saved me again.

I had to have a cake for my kid's school
annual cake walk and I'm so glad that I had
pinned this
Here's what I made at 6:00 AM.


This is what they look like before the icing and decorations.

And with all of the "frosting".

All creative credit should go to
my cake school
she's PRETTY awesome.

Did I Just Win?

The answers is: YES. 

I never win anything and this is not an exaggeration (it's just the truth), but that all changed today when just another hang up sent me a message saying that I had won a $25.00 certificate to fabric.com.  I'm so excited to put my order in, my wish list has already surpassed the $25.00. 


Thank you again Suzanne.

 Isn't there a saying that things happen in three's, should I go buy a lotto ticket?

Wednesday, April 25, 2012

Outside Heaven

It all started this time last year.  

We decided to build a deck.  Doesn't sound too crazy, right?

  Well, before we built the deck we thought we needed to reside the house and if we were going to reside we might as well do some stone work and if we're making the sides of the house look new then we should probably do the roof. 

 Do you see where I'm going? 

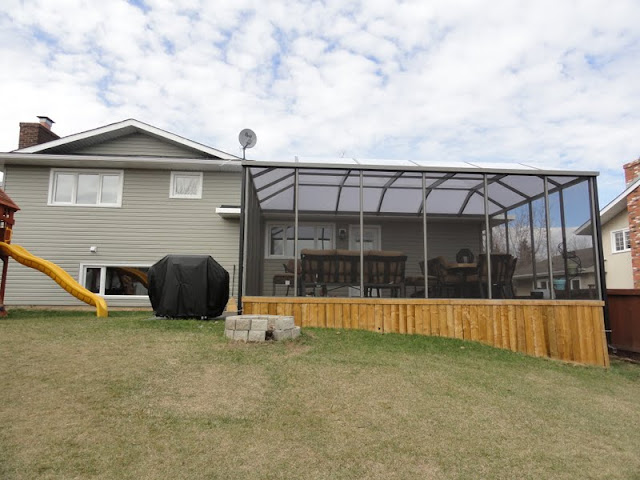
Well here is the now completed reno.

 BEFORE


AFTER

BEFORE (BACK)


AFTER (BACK)


 On our deck we built a screen room from Suncoast Enclosures.

I can not really tell you how much I LOVE my screen room!!!!!!
(I think I need to add another !)


Can you see the snow?
Well even though we had a late snowfall in April
I was still outside on my deck reading my books.


We've already had some parties on the deck and the family has eaten dinner twice. 
NO wasps bugging,
NO flies buzzing,
 NO mosquito's biting,
and the polycarbonate roof provides shade, but still lets in the light.


It's so bright and cheerful, I love being outside.
(So will my friends and family.)


It is truly a little bit of heaven in my own backyard.


With all the praise, you'd think I should have a job selling screen rooms!

Thanks Suncoast.

Monday, April 16, 2012

Minky Monsters

On Friday my SIL had a bunch of girls over to her house for a "Pinterest Party".  A very fun way of showing some of the projects we have been inspired to try and complete from pinterest.  There was very yummy food and excellent projects (and when she posts all the projects I'll create a link).  This is one of the inspired projects that I brought (here is where I was first inspired, but realized she was inspired here). 

 Around my house we call them MINKY MONSTERS and my kids love them. 

These are the first two that I've made, but the possibilities are endless with your fabric choices.

  In fact this is a great project for using up your scraps from
other projects as the ears, legs,
face and eye require such small amounts.


Here is a very quick tutorial on how I made them.

Cut the body fabric to desire width and length.
(Two pieces about 10"x 12")
You could change this to fit your needs.


Curve the top to make a nice head shape.  Cut so there are two body pieces.


Next cut out two ears and sew right sides together (then turn right side out)
these ears were cut from 3"x 3" squares


I like the legs long and skinny with a curved end. 
Legs were about 10" x 4" pieces. 
Fold so that it's 10"x 2" and sew curve and side closed.  Turn right side out and stuff.


OK I know this is a bit of a jump, but I totally forgot to take pictures of cutting the face, eye and the pocket....oops. 
 So cut an oval and smaller circle and sew down onto the body with BLACK thread and then zig-zag around the edge in WHITE.  Add a cute button on the eye.
  Make a pocket that is then sewn onto the tummy. 
Pin ears to the top of the head .  Do the same thing with the stuffed legs and add the back body piece and sew around right sides together. 
(leave a small hole in between the legs for turning it right side out.) 
 Stuff and hand stitch the opening.


I think they are so cute with their X and O eyes. 
Who wouldn't want Hugs and Kisses from these guys?


Truly a face a mother could love.


linking with


Pin It and Win It Wednesday


Tuesday, April 10, 2012

Ruffle Aprons

I have had these ruffled aprons pinned  forever and finally decided to make them for my daughter's "Hello Kitty Baking Birthday Party".  
I think they turned out so cute.


(and now for a very quick how to.)
 First I made a plain white apron by folding the material in half and then cutting a simple apron shape.


 Then I went around all the edges and sewed a 1/4 inch hem to give it a finished edge.


Made the neck strap by folding a 2 inch strip like this and sewing it closed and then attached it to the apron bib.


Next I drew on some guide lines on where to attach the ruffles.
(can you even see them?)


picked some nice bright fabrics and cut them 6 inches wide and
double the length of the bottom of the apron


and gathered and sewed them down for four layers of ruffles, starting at the bottom and working up.  The top fifth layer was sewn right sides together and then flipped up and top stitched at the top for a band for the straps to be sewn in.  (Sorry no picture.)


Yo-yo flowers were made out of the scraps for a cute embellishment.


The girls were so excited to have them it made them worth the effort.
I even had a mom tell me on Sunday that her daughter won't take hers off and wants to wear it everywhere.


I love the attitude these two girls had.....
I guess you gotta know their moms to understand....
hee hee.


Without any direction from me the girls kinda posed like each other in their pairings....funny.


I have to give a big thanks to my MIL and SIL as my machine broke mid assembly line and came to my rescue.

Thank you, thank you, thank you!!!!
They would not have been done at all on time without your help.

linking with


Monday, April 9, 2012

Easter Eggs

Well I wasn't totally prepared for egg colouring this year and I only had food colouring which doesn't give you a very deep intense colour. 

 So this year we thought they needed a little something special added to them. 
The kids picked the faces and I drew them on.
 Here they are.

(the kids had fun making scenes and then naming them)


"double trouble"

 "Why are your teeth so big"


"I think you need to take those anger management classes"


"the group"


 "that tickles"


 "I'm seriously scared"